
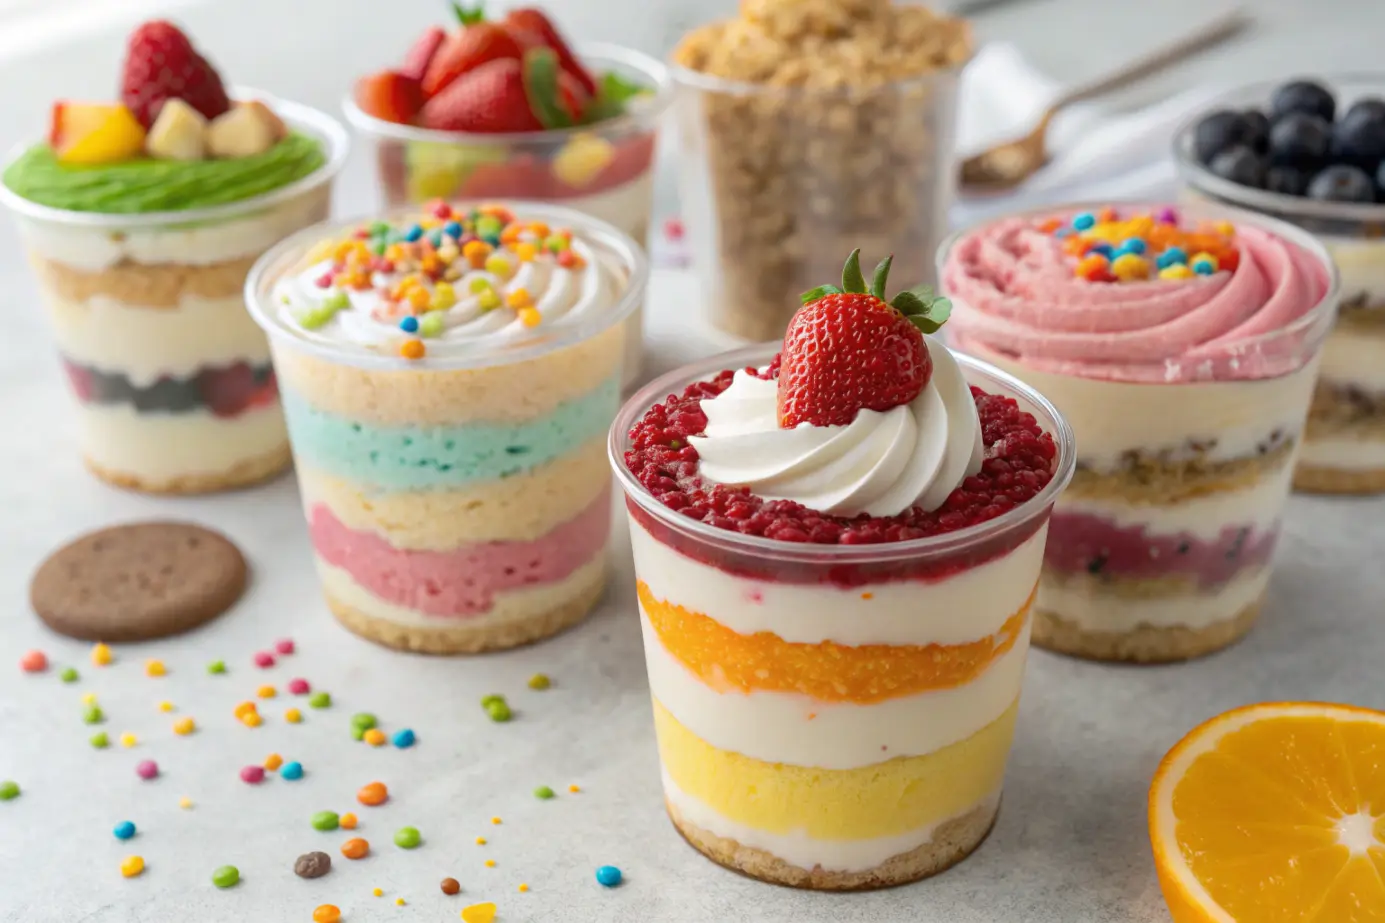
Cake cups are a delightful treat, perfect for parties or a simple indulgence. They offer convenience and deliciousness in a single serving. This article will explore everything you need to know about these tasty desserts. We’ll cover preparation, storage, and even the difference between cupcake liners and baking cups.
Understanding the Allure of Cake Cups
Cake cups are essentially cakes baked in individual containers. These containers can vary widely. Some popular options include ramekins and sturdy paper cups. The small size makes them ideal for portion control. They are also visually appealing and easy to serve.
The Versatility of Cake Cups
One of the best things about cake cup is their versatility. You can make virtually any cake flavor into a cake cup. This makes them perfect for accommodating different preferences. Furthermore, they are easy to customize with various toppings. Think frosting, sprinkles, fruit, or chocolate shavings.
Why Choose Cake Cups?
There are several reasons why people love cake cup. They are convenient for on-the-go enjoyment. They are also great for parties and gatherings. In addition, they can be made ahead of time. This reduces stress when you are hosting. Finally, they are simply fun to eat.
The Essential Guide to Making Amazing Cake Cups
Making cake cup is similar to making a traditional cake. However, there are a few differences to keep in mind. You’ll need the right containers. You will also want to adjust baking times. Let’s explore the key steps.
Choosing the Right Containers
The type of container will affect the final product. Ramekins provide a more elegant look. They are also oven-safe and reusable. Paper baking cups are convenient and disposable. However, you should choose a sturdy variety that won’t buckle. Glass or ceramic cups are excellent for individual servings, too.
Preparing the Batter
Most standard cake recipes can be adapted for cake cups. Simply prepare your batter as you would for a regular cake. However, you may need to slightly adjust the amount of leavening agent. This is because of the smaller size and quicker baking time.
Filling the Cups
It’s important not to overfill the cups. Generally, filling them about two-thirds full is a good guideline. This leaves enough space for the cake to rise without overflowing. An ice cream scoop can help you portion out the batter evenly.
Baking Cake Cups to Perfection
Baking times for cake cups are typically shorter than for full-sized cakes. Monitor them closely. Use a toothpick to check for doneness. The toothpick should come out clean when the cake is done. Remember, smaller cakes bake faster. Therefore, check them often.
Cooling and Decorating
Allow your cake cup to cool in their containers. This prevents them from falling apart. Once cooled, you can decorate them with frosting, sprinkles, or other toppings. Consider using a piping bag for a professional finish.
Cake Cups: The Ultimate Storage and Longevity Guide
Proper storage is essential for maintaining the quality of your cake cup. Knowing how long they will last is also important. This section covers the best practices for storing and preserving your treats.
How Long Do Cake Cups Last?
Generally, unfrosted cake cup will last for about 2–3 days at room temperature. In addition, you can extend their shelf life by storing them in the refrigerator. Refrigerated, they can last for up to a week. Frosted cake cup will last about 2-3 days in the fridge.
Storing at Room Temperature
To store at room temperature, ensure the cake cup are in an airtight container. This will help to prevent them from drying out. Place them in a cool, dry place away from direct sunlight. This is crucial for maintaining their moistness.
Refrigerating Cake Cups
If you need to store your cake cup for longer, refrigerate them. Again, use an airtight container to prevent them from absorbing odors from the fridge. This will help them stay fresh and tasty.
Freezing Cake Cups
For longer storage, you can also freeze your cake cups. Wrap them individually in plastic wrap. Then, place them in a freezer-safe container. This prevents freezer burn. They can last for a couple of months frozen.
Thawing Frozen Cake Cups
When you’re ready to eat your frozen cake cups, thaw them at room temperature. Alternatively, you can thaw them in the refrigerator overnight. This ensures that they retain their original texture and taste.
The Great Debate: Cupcake Liners vs. Baking Cups for Your Cake Cups
Understanding the difference between cupcake liners and baking cups is important. This will help you choose the right ones for your cake cups. These are not always interchangeable. Let’s explore the main differences.
Cupcake Liners
Cupcake liners are typically made of thin paper. They are primarily designed for cupcakes. Therefore, they often require a cupcake pan for support. These are often decorative. They come in various colors and patterns.
Baking Cups
Baking cups, on the other hand, are typically more rigid and sturdy. They can stand alone without the need for a cupcake pan. They are frequently made of thicker paper or foil. They are ideal for baking single-serving treats. These can often be used for muffins and similar items.
Choosing the Right Option
For cake cups, baking cups are often the preferred choice. Their sturdiness provides better support. They also hold their shape better during baking. However, you can use cupcake liners, too. Just make sure to put them in a muffin tin or ramekin. It will provide support for the liner as it bakes.
Unique Flavor Ideas for Your Cake Cups
Beyond basic vanilla and chocolate, there are many exciting flavors you can try. This section explores some unique and delicious flavor combinations for cake cups. Let’s dive into these delicious ideas.
Spiced Cake Cups
Consider adding warming spices like cinnamon, nutmeg, and ginger. These are perfect for fall or winter. Combine these with flavors such as pumpkin or apple. This creates a cozy and satisfying treat. The aromas alone are incredibly enticing.
Fruity Cake Cups
Incorporate fresh or dried fruits into your cake cups. Berries, citrus, and tropical fruits are all excellent choices. Lemon blueberry, raspberry swirl, or mango coconut cake cups are sure to impress. These flavors are bright and refreshing.
Chocolate Indulgence Cake Cups
For serious chocolate lovers, try a variety of chocolate combinations. Think dark chocolate with chili, white chocolate with raspberry, or milk chocolate with caramel. These flavors offer a rich and decadent experience. Experiment and have some fun!
Nutty Cake Cups
Nuts add flavor and texture to cake cups. Try using almonds, pecans, walnuts, or hazelnuts. They pair well with a variety of flavors. Chocolate and nuts are a classic combination. Consider adding a coffee or maple element.
Troubleshooting Common Cake Cup Issues
Sometimes, baking doesn’t go as planned. This section addresses some common issues you might encounter when making cake cups. Understanding these problems will help you achieve baking success. Let’s explore these common pitfalls.
Dry Cake Cups
If your cake cups are dry, it could be due to overbaking. Also, consider if you added enough liquid to the batter. Another factor is that you may have been using too much flour. Ensure you are measuring your ingredients accurately.
Cake Cups Sinking in the Middle
This can happen when there’s too much leavening agent or if the batter is too wet. Check your recipe and ensure you’re using the right measurements. Also, don’t open the oven door too early, as this can cause the cake to collapse.
Uneven Baking
Uneven baking can occur if your oven has hot spots. Using an oven thermometer will help you monitor the temperature. Rotating the cake cups halfway through baking is a good idea. Ensure even heat distribution, especially if you are making multiple batches.
Cake Cups Sticking to the Container
Greasing or lining your cake cup thoroughly is important. Use baking spray or parchment paper liners. This will help to prevent sticking. Let them cool before removing them to reduce the chances of breaking.
Cake cups are a wonderful way to enjoy cake in a single-serving format. They’re easy to prepare, store, and customize. You can experiment with different flavors and toppings. Therefore, there is endless potential for creativity. Remember, the right container and proper storage techniques are crucial. You will soon be creating incredible cake cup for all occasions!
FAQ
What are cakes in cups called?
Cakes baked in individual cups are commonly called cake cup. They may also be referred to as mug cakes when cooked in a mug. The term “cake in a cup” is also sometimes used to describe these tasty treats.
How far in advance can you make cake cups?
You can make cake cup up to 2–3 days in advance if kept at room temperature. Refrigerated, they can last for up to a week. For longer-term storage, you can freeze them for several months. Ensure proper sealing in airtight containers to keep them fresh.
How long do cake cups last?
Cake cup generally last for 2–3 days at room temperature. In the refrigerator, they can last for up to one week. When frozen, they can last for a couple of months. These times are based on proper storage practices.
What’s the difference between cupcake liners and baking cups?
Cupcake liners are thin and typically need a muffin pan for support. Baking cups, conversely, are more sturdy and can stand alone. Therefore, they are often made of thicker paper or foil. Baking cups are ideal for single-serving treats like cake cup.
Print
Cake Cups : The 7 Amazing Secrets
- Total Time: 55 minutes
- Yield: 12 servings 1x
Description
Cake cups are a fun and convenient way to enjoy your favorite cake flavors in an easy-to-serve, portable format. Perfect for parties, gatherings, or just a sweet treat on the go, these individual dessert cups layer moist cake, creamy frosting, and delicious toppings. Customize them with different flavors and decorations for any occasion!
Ingredients
(Makes about 12 cake cups)
- For the Cake:
- 2 ½ cups (315g) all-purpose flour
- 2 ½ teaspoons baking powder
- ½ teaspoon salt
- 1 cup (226g) unsalted butter, softened
- 2 cups (400g) granulated sugar
- 4 large eggs
- 1 tablespoon vanilla extract
- 1 cup (240ml) whole milk
- For the Buttercream Frosting:
- 1 cup (226g) unsalted butter, softened
- 4 cups (480g) powdered sugar
- 2 tablespoons heavy cream
- 1 teaspoon vanilla extract
- Food coloring (optional)
- For Assembly & Toppings:
- Clear plastic cups (8 oz or 9 oz)
- Crushed cookies, sprinkles, or fruit for topping
- Whipped cream (optional)
Instructions
- Bake the Cake:
- Preheat oven to 350°F (175°C). Grease and flour a 9×13-inch baking pan.
- In a bowl, whisk together flour, baking powder, and salt.
- In a large bowl, beat butter and sugar until fluffy. Add eggs one at a time, mixing well after each addition. Stir in vanilla.
- Gradually add the flour mixture, alternating with milk. Mix until just combined.
- Pour into the prepared pan and bake for 30–35 minutes. Let cool completely.
- Prepare the Frosting:
- Beat butter until smooth. Gradually add powdered sugar.
- Mix in heavy cream and vanilla until fluffy. Add food coloring if desired.
- Assemble the Cake Cups:
- Cut the cooled cake into small cubes.
- In each cup, layer cake pieces, frosting, and repeat.
- Add toppings like crushed cookies, sprinkles, or fruit.
- Serve & Enjoy:
- Refrigerate for 30 minutes if serving chilled.
Notes
- Try different cake flavors like chocolate, red velvet, or lemon.
- Swap buttercream for whipped cream for a lighter version.
- Perfect for birthdays, weddings, or baby showers!
- Prep Time: 20 minutes
- Cook Time: 35 minutes
- Category: Dessert
- Method: Baking
- Cuisine: American
Nutrition
- Serving Size: 1 cake cup
- Calories: 380 kcal
- Sugar: 42 g
- Sodium: 160 mg
- Fat: 18 g
- Saturated Fat: 11 g
- Unsaturated Fat: 7 g
- Trans Fat: 0 g
- Carbohydrates: 50 g
- Fiber: 1 g
- Protein: 3 g
- Cholesterol: 70 mg
Keywords: Cake Cups, Mini Cakes, Portable Desserts, Party Treats, Cup Desserts